Running an online business means juggling a dozen tasks at once — answering leads, sending follow-up emails, posting on social media, updating spreadsheets. Most of that doesn’t require your brain. It just requires your time. That’s exactly the problem Zapier AI solves. When you set up Zapier AI automations for your online business, you hand those repetitive jobs to software and get your hours back. This beginner-friendly guide walks you through everything: what Zapier AI actually does, how to build your first automation in under 15 minutes, and the exact workflows that save online business owners the most time every week.
What Is Zapier — And What Makes the AI Features Different?
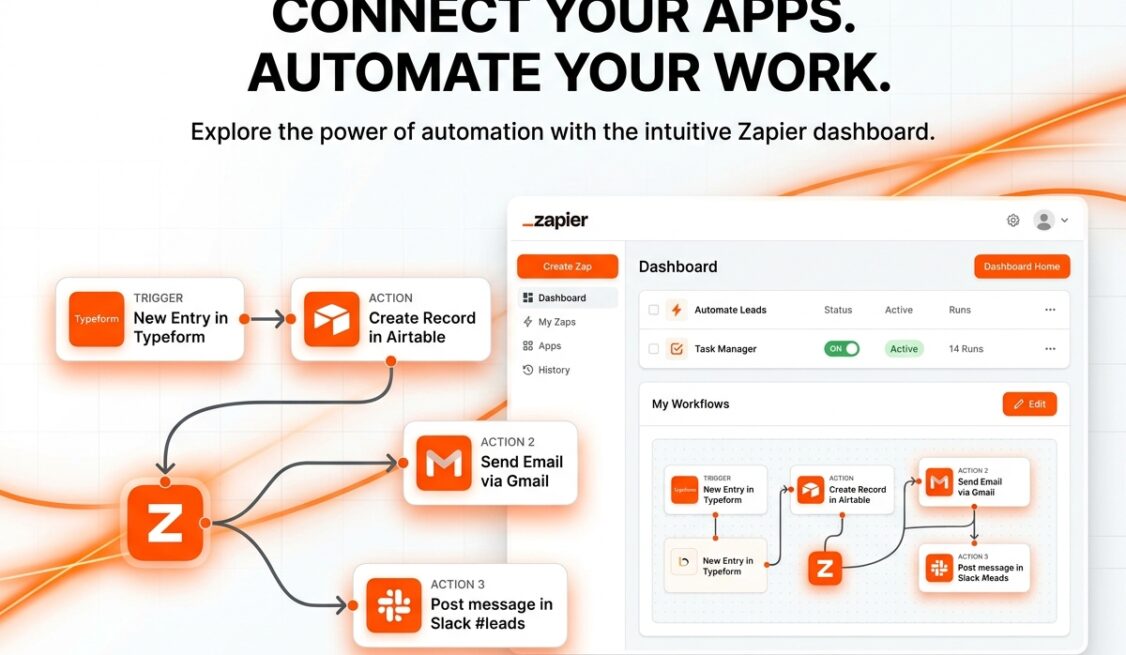
Zapier is a no-code automation platform that connects over 7,000 apps. The core idea is simple: when something happens in one app (a “Trigger”), Zapier automatically does something in another app (an “Action”). No developers required.
The AI layer on top changes the game. Instead of manually mapping every field and writing every rule, you can describe what you want in plain English and Zapier’s AI will suggest — or even build — the entire workflow for you. For non-technical business owners, this is the difference between automation being possible and automation actually getting done.
Here’s what the AI features inside Zapier can do:
- AI-powered Zap builder: Type what you want to automate in a sentence. Zapier suggests the trigger, actions, and app connections automatically.
- AI by Zapier (the native action): Use AI inside a workflow to summarize text, extract data from emails, draft replies, classify leads, or generate content — without needing a separate ChatGPT subscription.
- Smart suggestions: Zapier analyzes your connected apps and recommends workflows based on how you already work.

Before You Build: The 3 Concepts You Need to Understand
Before you start clicking buttons, get these three concepts clear. They make every Zap you build from here on easier to understand.
1. Trigger The event that starts a workflow. Examples: a new form submission, a new email in Gmail, a new row added to Google Sheets, a new purchase in Shopify.
2. Action What Zapier does in response to the trigger. Examples: send a Slack message, create a ClickUp task, add a row to a spreadsheet, send a welcome email via ConvertKit.
3. Zap The complete automation — one trigger connected to one or more actions. You can have multi-step Zaps that chain several actions together from a single trigger.
Step-by-Step: How to Set Up Zapier AI Automations for Your Online Business
Step 1: Create Your Free Zapier Account
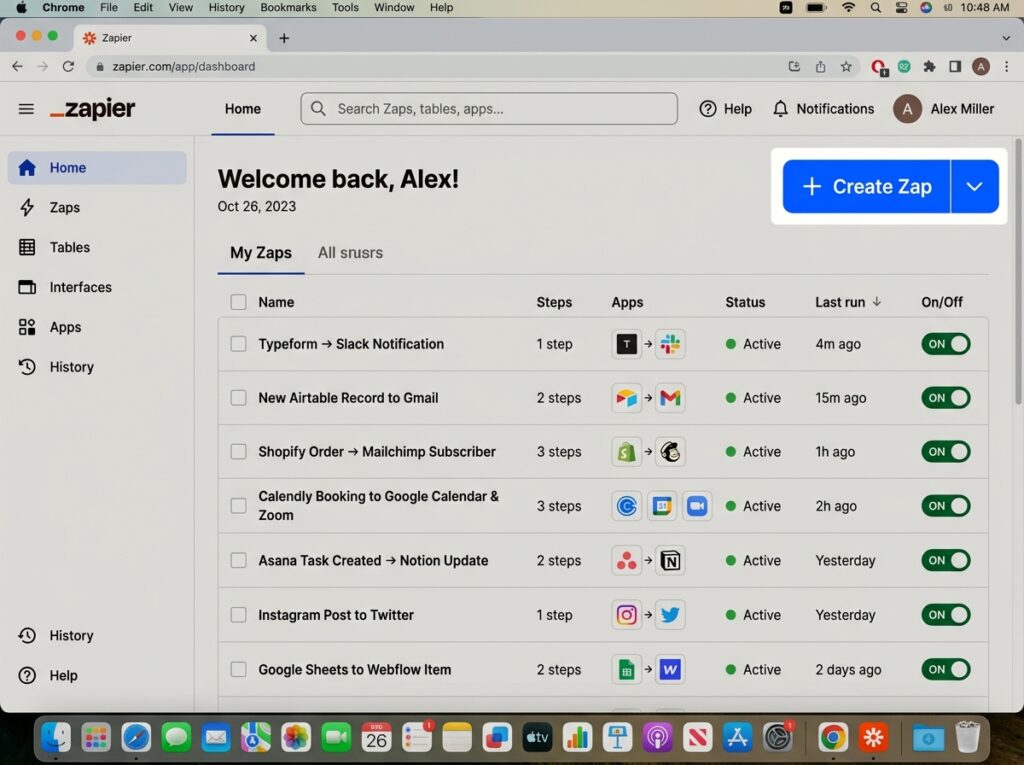
Go to zapier.com and sign up. The free plan allows up to 100 tasks per month across 5 active Zaps — enough to test the platform and build your first essential workflows.
Once you’re inside the dashboard, click + Create → New Zap to start building.
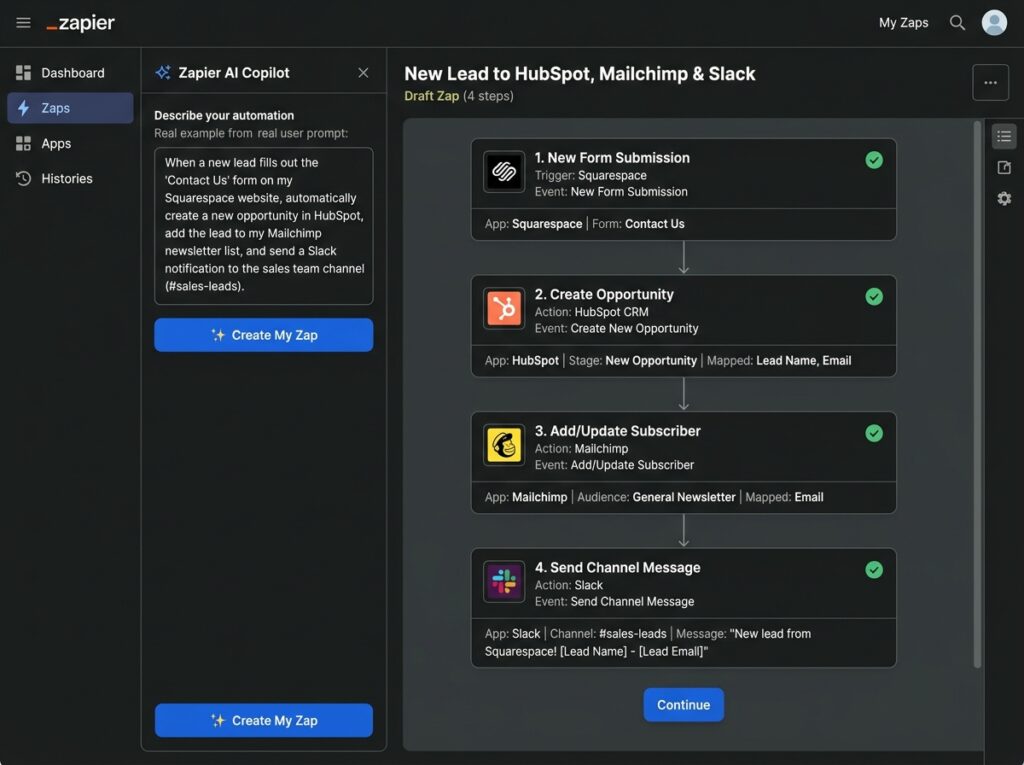
Step 2: Use the AI Builder to Describe What You Want
This is where Zapier’s AI pays off immediately. Instead of hunting through 7,000 apps to find the right trigger and action manually, click the “Describe what you want to automate” field at the top of the Zap editor and type your automation in plain language.
Some examples that work well:
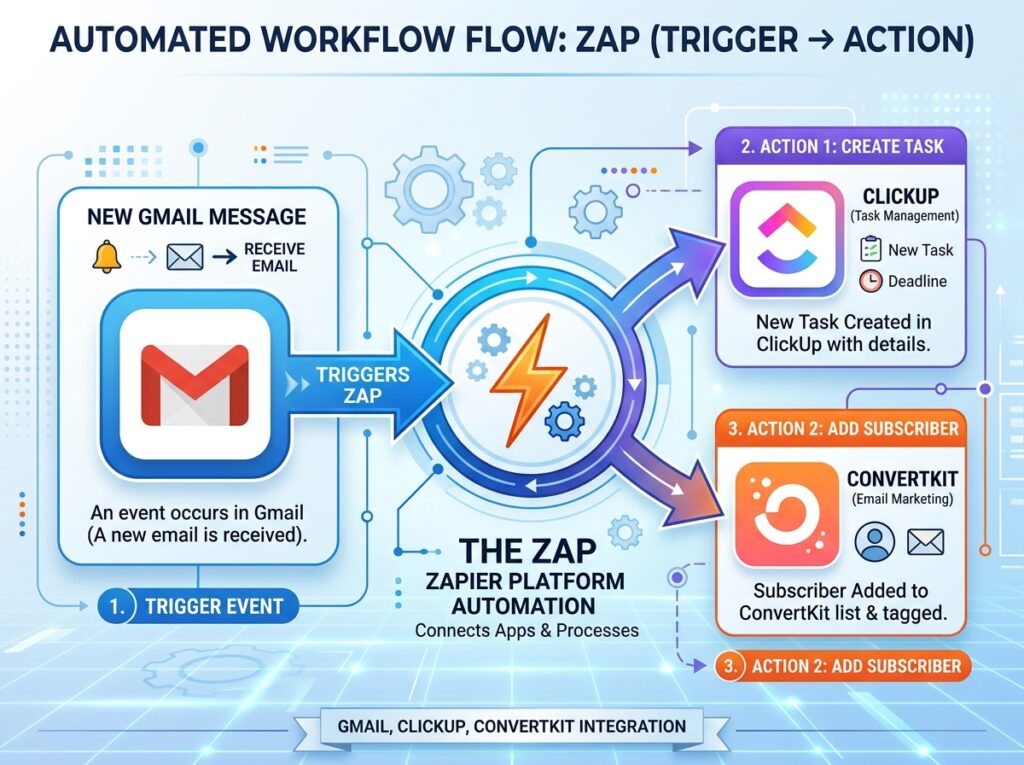
- “When someone fills out my Typeform lead form, create a task in ClickUp and send them a welcome email via ConvertKit.”
- “When I get a new email in Gmail with the subject line ‘Invoice’, add the sender’s details to Google Sheets.”
- “When I publish a new blog post in WordPress, share it automatically to my Facebook Page and Twitter.”
Zapier’s AI reads your description and pre-builds the Zap structure — trigger app, action apps, and the connections between them. You review, adjust, and activate. It cuts setup time from 20 minutes to about 3.
Step 3: Connect Your Apps
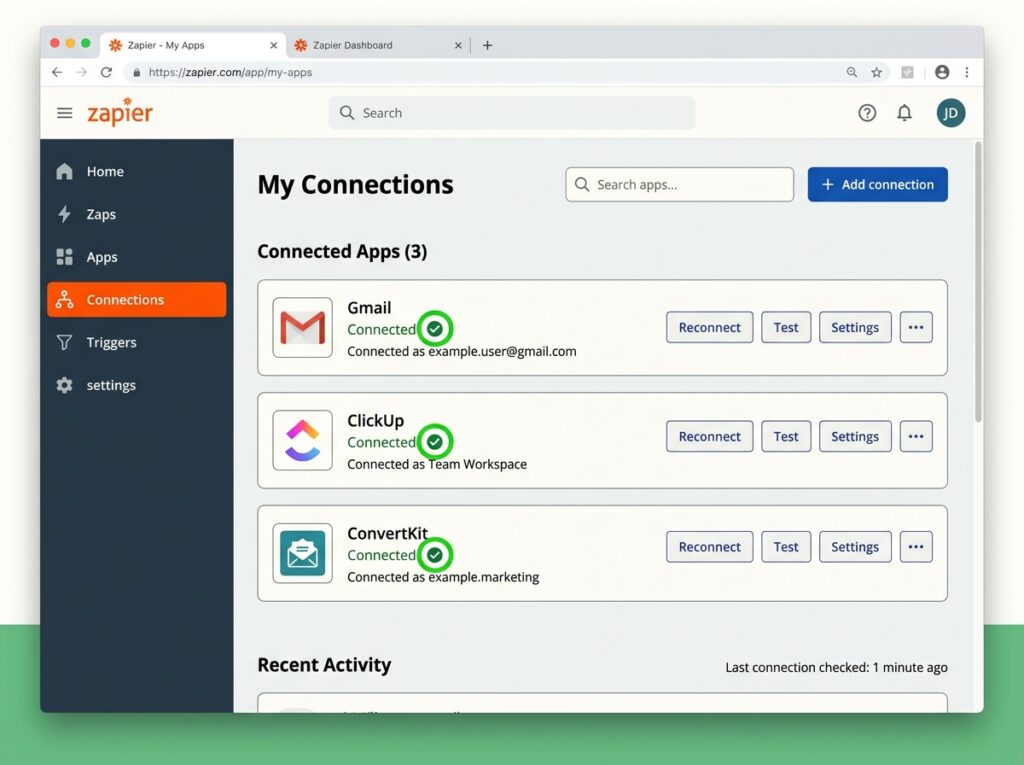
After the AI sets up the structure, you’ll need to authenticate each app — which just means logging in and giving Zapier permission to interact with it. You do this once per app, and Zapier stores the connection for all future Zaps.
For each app connection:
- Click Sign in to [App Name]
- A pop-up will open — log in with your credentials
- Approve the permissions
- Zapier confirms the connection with a green checkmark
Apps you’ll likely connect early: Gmail or Outlook, Google Sheets, ClickUp or Notion, ConvertKit or ActiveCampaign, your form tool (Typeform, Google Forms, or Gravity Forms).
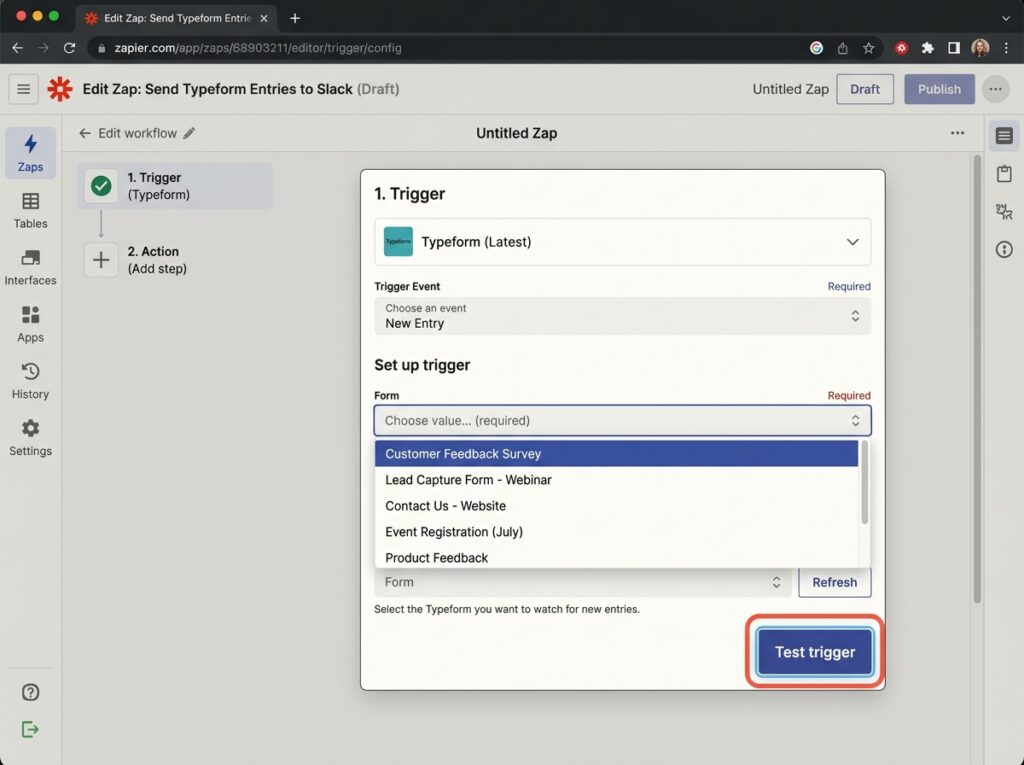
Step 4: Configure Your Trigger
Once apps are connected, configure the trigger details. This tells Zapier exactly what event should fire the workflow.
For example, if your trigger is “New Form Submission in Typeform,” you’ll select:
- Which form? (Zapier pulls a list from your account)
- Any filters? (Optional — e.g., only trigger if the budget field says “$1,000+”)
Click Test trigger to pull in a real sample submission from your account. This sample data is used to map fields in the next actions.
Step 5: Set Up Your Actions — Including AI by Zapier
Now configure what happens after the trigger fires. If you’re using multi-step Zaps, you can stack several actions in sequence.
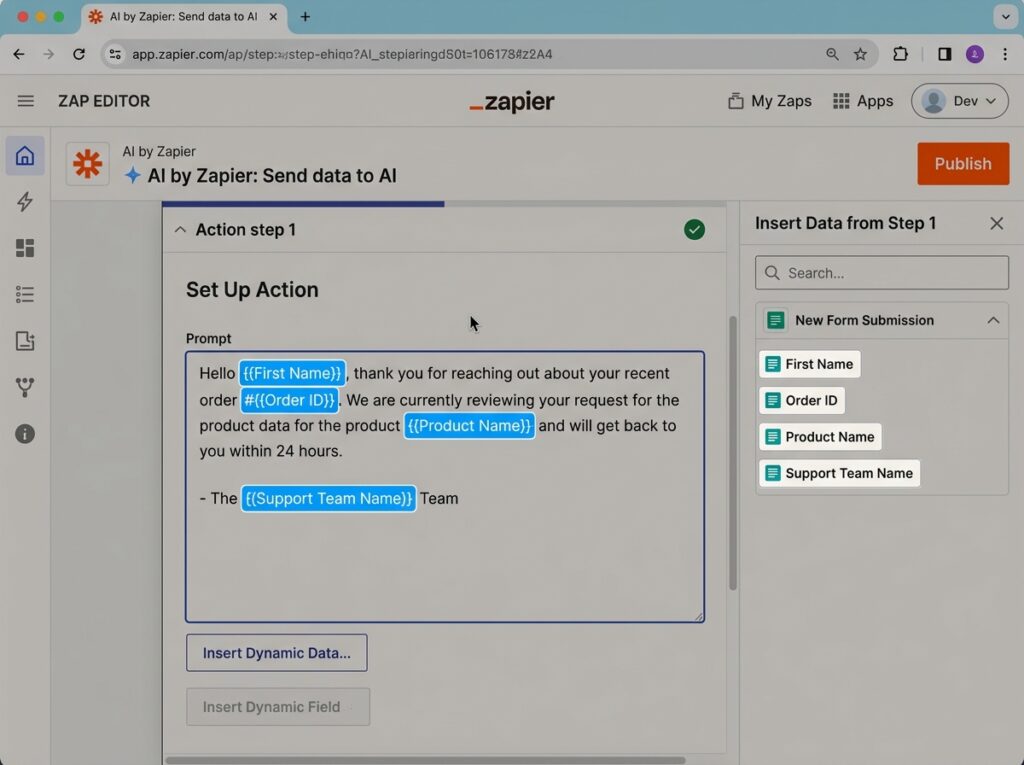
Adding AI by Zapier as an action is where this gets powerful. Let’s say your trigger is a new lead form submission. You can add an “AI by Zapier” step between the trigger and your email action to:
- Summarize the lead’s notes field into 2 sentences
- Score the lead as Hot / Warm / Cold based on their answers
- Draft a personalized first-response email based on their name and business type
To add it:
- Click + to add a new action step
- Search for “AI by Zapier”
- Choose the action event: Understand text, Summarize, Transform, or Generate text
- In the prompt field, reference data from your trigger using dynamic fields (e.g., “Write a short welcome email for {{First Name}} who runs a {{Business Type}} business”)
- The AI output becomes a variable you can use in the next action — like the email body in ConvertKit
Step 6: Test the Full Zap
Before activating, always test the complete workflow end to end.
- Click Test step on each action
- Zapier runs the action using your sample trigger data — a real task gets created, a real email gets sent, or a real row gets added to your sheet
- Check each connected app to confirm the data landed correctly
Fix any field mapping issues before going live.

Step 7: Activate and Monitor
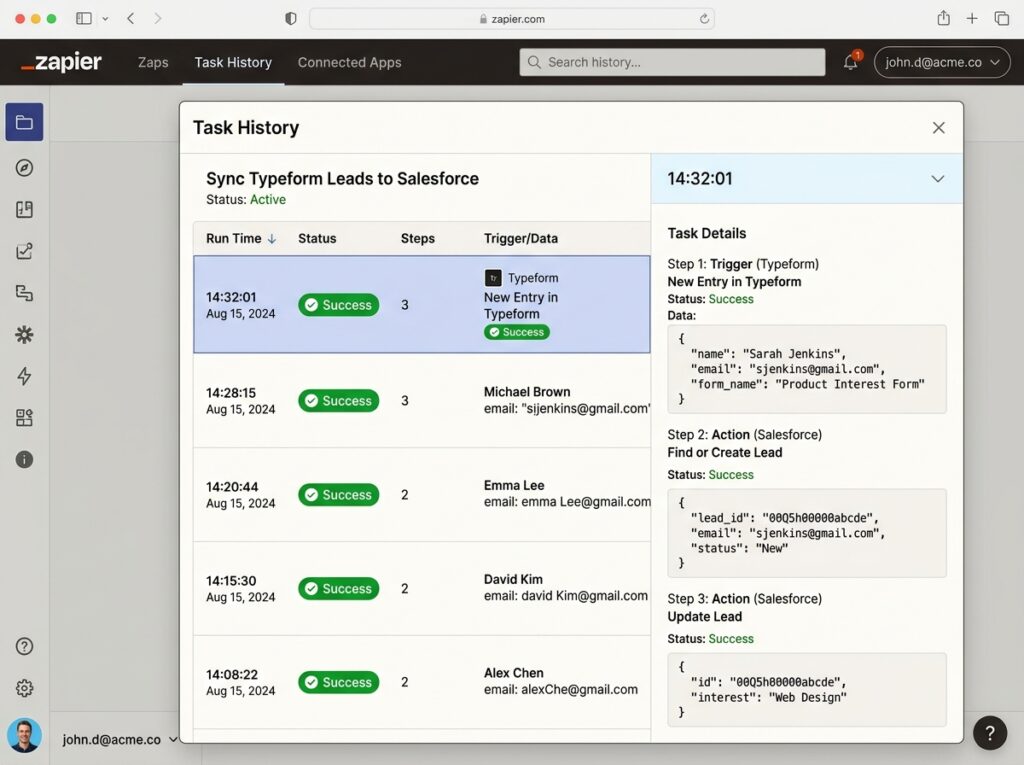
Once you’re happy with the test results, click Publish Zap to turn it on. From the dashboard you can see:
- Task history — every time the Zap ran, what data passed through, and whether it succeeded or errored
- Task usage — how many of your monthly tasks you’ve used
- Zap status — toggle any Zap on or off in one click
Check your task history weekly for the first month. Errors usually happen because an app connection expired or a field name changed — both easy fixes.
Automations Every Online Business Should Have
Now that you know how to build Zaps, here are the five workflows that deliver the most immediate time savings. Build these first.
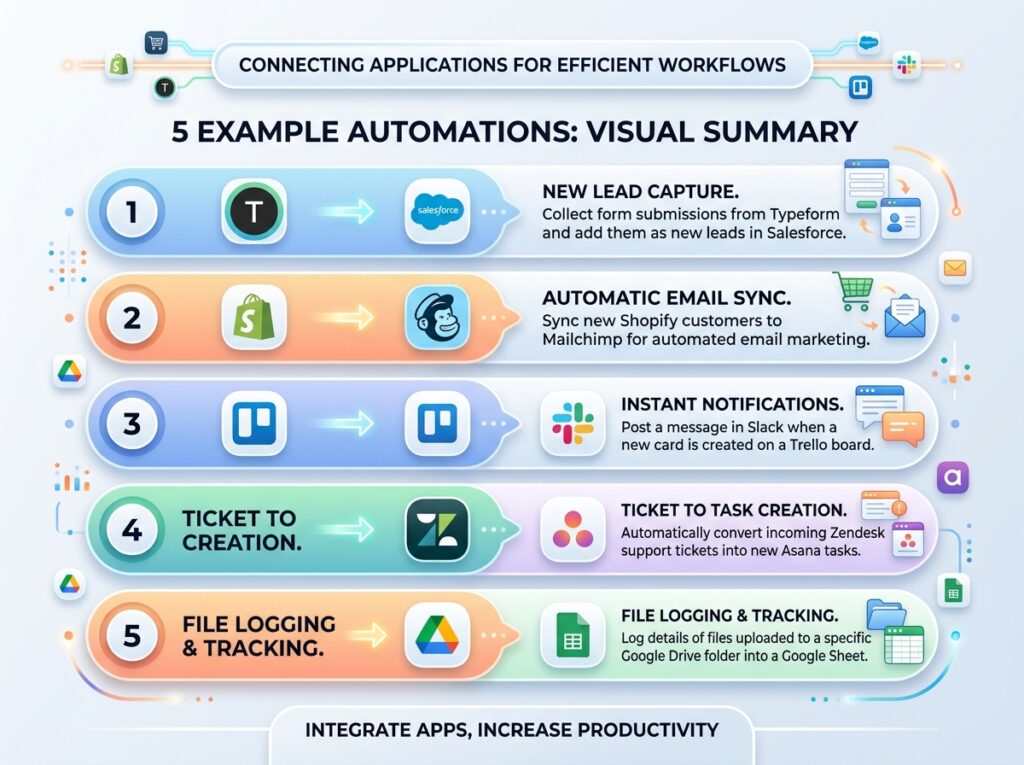
1. Lead Capture → Task + Welcome Email
Trigger: New form submission (Typeform / Google Forms) Actions:
- Create a task in ClickUp with the lead’s details and a follow-up due date
- Send a personalized welcome email via ConvertKit using AI by Zapier to draft the body
Time saved: 10–15 minutes per lead, every day.
2. New Customer → Onboarding Sequence
Trigger: New purchase in Shopify or ThriveCart Actions:
- Add the customer to a ConvertKit or ActiveCampaign sequence
- Create an onboarding task in ClickUp
- Post a Slack notification to your team channel
Time saved: Eliminates manual onboarding setup for every new buyer.
3. Gmail Invoice Emails → Google Sheets Tracker
Trigger: New email in Gmail matching the label “Invoice” Actions:
- AI by Zapier extracts sender name, amount, and due date from the email body
- Appends a new row to your Google Sheets income tracker automatically
Time saved: 5–10 minutes per invoice. Keeps your books current without lifting a finger.
4. New Blog Post → Social Media Distribution
Trigger: New post published in WordPress Actions:
- Post to Facebook Page with the article title and URL
- Post to LinkedIn
- Send a notification to your email list via ConvertKit
Time saved: 20–30 minutes of manual posting per article.
5. Weekly Report Auto-Generation
Trigger: Schedule (every Monday at 8am) Actions:
- Pull last week’s data from a connected Google Sheets report
- AI by Zapier formats the data into a short performance summary
- Send it to your email or a Slack channel
Time saved: Replaces a manual weekly check-in that would otherwise eat your Friday evening.
Zapier vs Make: Which Should You Use?
![]()
Zapier | Make | |
|---|---|---|
Ease of use | Easiest — ideal for beginners | Steeper learning curve |
AI features | Built-in AI by Zapier action | Requires external AI module |
App library | 7,000+ apps | 1,800+ apps |
Free plan | 100 tasks / 5 Zaps | 1,000 operations / month |
Pricing | From $19.99/mo | From $9/mo |
Best for | Quick setups, non-technical users | Complex multi-branch logic |
For most online business owners starting out, Zapier is the right call. Its AI features are more mature, the app library is larger, and you’ll have your first workflow running in minutes rather than hours. Make becomes worth considering once you’re running more complex, conditional automations — or if you want to reduce costs at scale.
Common Mistakes to Avoid
Trying to automate too much at once. Pick one process that costs you time every single day, automate that first, and let it run for a week before adding more.
Not testing before activating. Skipping the test step means real customers get affected by errors. Always test every action before going live.
Forgetting to monitor task usage. On the free or Starter plan, if you hit your task limit Zaps stop running. Set a usage alert in Zapier’s settings or upgrade before you hit the ceiling.
Using vague AI prompts. The quality of AI by Zapier’s output depends entirely on your prompt. Reference specific dynamic fields, give the AI a clear format to follow, and test the output before it touches a customer.

Final Thoughts
When you set up Zapier AI automations for your online business the right way, the return is immediate and compounding. The first Zap you build saves you 30 minutes this week. After ten Zaps, you’ve automated hours of work you used to do manually every single day — lead intake, follow-ups, reporting, publishing, customer onboarding.
Start with one workflow today. Use the AI builder to describe it in plain English, connect two apps, test it, and activate. That’s all it takes to get your first automation running in under 15 minutes.
The goal isn’t to automate everything at once. It’s to reclaim your time, one workflow at a time, until your business runs on systems instead of sprints.
Frequently Asked Questions
Do I need coding skills to use Zapier AI? No. Zapier is a no-code platform. The AI builder lets you describe what you want in plain English and suggests the entire workflow automatically.
How much does Zapier cost for a small business? Zapier’s free plan includes 100 tasks/month and 5 Zaps. The Starter plan is $19.99/month for 750 tasks. Most small businesses run on the Professional plan at $49/month.
What is “AI by Zapier”? A native Zapier action that lets you run AI tasks — summarizing, generating, classifying, or extracting data — inside any workflow without a separate ChatGPT subscription.
Can Zapier connect to ClickUp? Yes. ClickUp is a fully supported Zapier integration with 50+ trigger and action options, including creating tasks, updating statuses, and tagging team members.
What happens if a Zap fails? Zapier logs the error in your task history with a description of what went wrong. You can review it, fix the issue, and replay the failed task.
Disclosure: Some links in this article are affiliate links. If you purchase through them, we may earn a commission at no extra cost to you. We only recommend tools we’ve tested and believe are genuinely useful for online business owners
Last modified: June 15, 2026


")

